Initial idea how to use a screw to reduce the bone fragments introduced screws to create the corridor where the nail can pass and enable alignment of the fragments whilst passing the nail.
Using above described method we realised that sometimes poller screw was to much on the way of the trajectory of the nail, but still perfectly reduction of the fracture was achieved. Out of this experience simple rule was made.
Rule No.1
IF IT LOOKS RIGHT IT IS WRONG AND IF IT LOOKS WRONG IT IS RIGHT.
Next thing we noticed that the nails can easily be bent to facilitate anatomical or almost anatomical reduction of the fragment. Rule was established.
Next thing we noticed that the nails can easily be bent to facilitate anatomical or almost anatomical reduction of the fragment. Rule was established.

Next thing we noticed that the nails can easily be bent to facilitate anatomical or almost anatomical reduction of the fragment. Rule was established.
Rule No.2
USE THE THINNEST POSSIBLE NAIL TO ALLOW NAIL TO DEFORM AND NOT TO BREAK THE BONE.
But before we proceed let’s explain where the name “POLLER” or “BLOCKING” screw comes from. Check the short video on your left.
As you can see it comes from the name “BOLLARD”. And it does exactly the same. Stands on the way of a nail and doesn’t let the nail to go its way. Nail can only go in the direction determined by the screw.
And this is not all. It can also reduce the fragments and compress them. So
ANATOMICAL REDUCTION + INTERFRAGMENTARY COMPRESSION = ABSOLUTE STABILITY
We agree that this is not in line with standard teaching on nailing, but practice confirms it. We have submitted article on results of poller screw fixation and it impact on callus index. Very interesting results confirming above statement. As soon as we get it published will include the link to it. But even if you just look at the images below, to me it looks like a pretty good reduction.
And because the nail is bent, it will maintain the pressure throughout the healing process. For example lag screw compression force is at its peak when applied and than drops each day (visco-elasticity, bone reabsorption…)

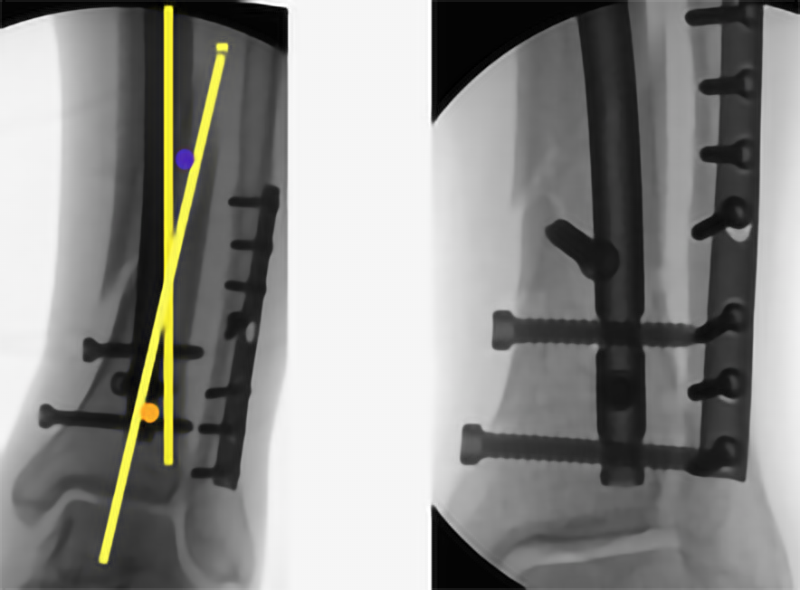
Anatomical reduction of distal tibial fracture using poller screw.
Planned position of Poller screw according to the fragment axises (yellow lines). Orange is position of a first choice poller screw and blue of second choice poller screw if first one (orange) does not work.
How you decide where to place a poller screws? There are three ways known to us:
1. Concave side of the fracture. This is slightly unpredictable but original method but can get wrong.
2. The acute angle of the fracture lines. You draw the alignment lines of both fragments and put a screw in the acute angle between both lines. Poller screw goes in the bone slightly away from the centre. Picture on the left. (abstract)
3. Mobile and static fragment. On the images below you will see two fragments. Proximal tibia is static fragment as the position of the nail in it cannot be changed. In the mobile fragment (distal tibia in this case) you can affect the position of the nail. And this is where the poller screw comes into action. You have to understand where the mobile fragment should move. Draw the imaginary line of the nail trajectory and position poller screw on the side of the nail in which direction you want mobile fragment to go. If you are using thin nail (8 or 9mm for tibial) you can put the poller screw more or less in the middle. It is very rare that you need poller screws in static and dynamic fragment.
Two examples of basic use of poller screw(s) are below.
At least this type of tibia fractures is in my opinion the most appropriate to start using poller screws from.
Third Generation Poller Screws
First Generation of Poller screws were screws inserted to create a corridor inside the bone.
Second Generation of poller screws are inserted in the way that the fracture is reduced and compressed using elastic properties of a nail. The nail would deflect and create long term compression on the fracture. It was not rare occurrence that reductio has improved over the time. But the poller screws are placed on one side of the fracture only (one fragment).
Third Generation of poller screws are screws inserted on both sides of the fracture, basically principles of second generation applied on the both side of the fracture. I am getting slowly better understanding of it and short term results are impressive.
Case below is an open proximal tibia fracture (Grade GA 3A), which was nailed using the Third generation poller screws principles two months ago.
Recently patient walked unaided into examination room without any limp. X-rays are below. Another example can be found here where femoral non-union was revised using thinner nail without any reaming but applying the third generation poller screw principles.
Epicentric poller screws in osteoporotic bone
Epicentric placement of poller screws is in my opinion clinically related to shorter union time, better reduction and less pain. Whilst there is no doubt why the reduction is better and why the fractures unite quicker, the reason for less pain is very likely in decreasing shear forces on the fracture site. Actually it looks that we are converting shear forces into compression forces. It is beyond my skills to prove it with a mathematical model.
The case below is a patient with mild to moderate osteoporosis of the tibia and osteoarthritis of the ipsilateral knee. In a level fall left tibia broke.
In figure of 4 position for nailing epicentric poller screws were inserted with slightly conservative positioning (not too much on the path of the nail), canal reamed over guide wire to 9.5mm for 9mm tibia nail (I used 9mm nail as the 8 mm which would be my preferred option was not available). One distal locking in the medial to lateral direction, back slapping until fracture closed and one proximal locking. And the result is below.
Post op instructions included full weight bearing and passive/active physiotherapy exercises.
On 3rd postoperative day patient able to SLR, bend her knee to 90 deg comfortably. Pain is/was under control throughout.
Discharged.
Follow up in 6 weeks.
Epicentric poller screws in comminuted spiral fracture
Spiral fractures are known to be the best examples for second and third generation poller screws.